This article discusses the various Admin Settings available in DivvyHQ's Calendar Admin.
TABLE OF CONTENTS
General Settings Tab
Within the General Settings tab in the Calendar Admin, admins and Editors have the ability to customize each content calendar with the following settings:
- Edit the name of a calendar
- Determine the hierarchy of a calendar (Enterprise Only)
- Set the calendar default deadline time
- Specify a calendar color
- Delete a calendar

To start managing these general settings, choose the calendar you wish to edit from the blue header drop down menu. With your calendar selected, click Edit to expose the editable fields. Make your adjustments and then click SAVE.
Caution: If you wish to delete a calendar, note that any content that has been associated with that calendar will also be deleted. A warning message will remind you of this when you click delete.
Content Types Tab
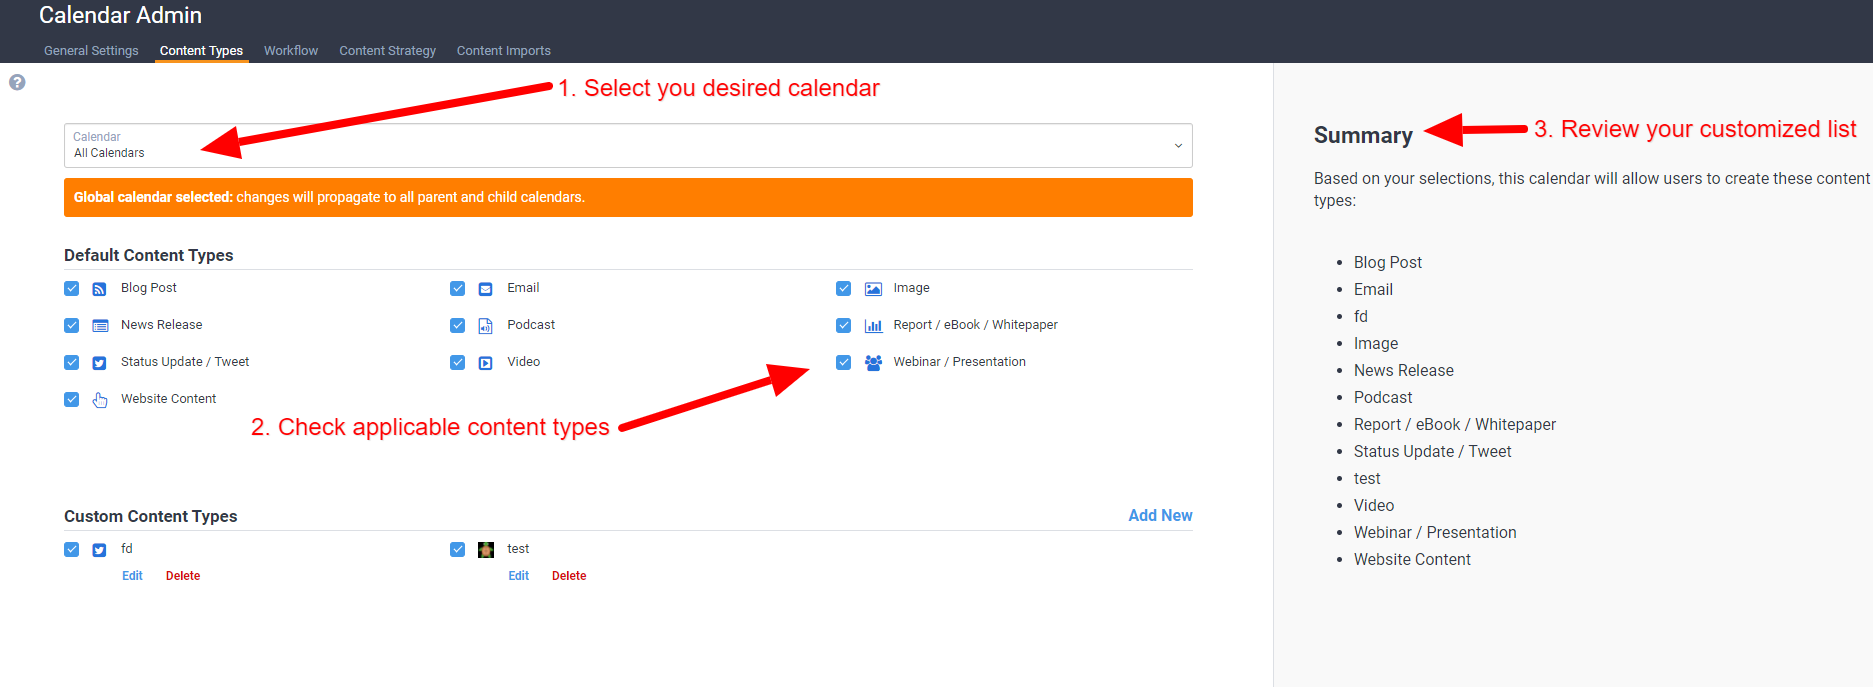
The Content Types tab gives admins and editors the ability to specify which types of content should be produced and managed within a specific calendar. The Default Content Types section displays the list of default content types that DivvyHQ supports out of the box. The Custom Content Types section allows you to input your own unique content types. The right-hand column shows you the final list of content types that have been selected via the checkboxes in the two previous columns.
The primary goal here is to help you narrow down the list of content types that will likely need to be managed and produced within an individual calendar. A customized list ensures there is no confusion when your users are adding or working with content in DivvyHQ.

Calendar Selection Prior to Customizing Content TypesIn most cases, you will be customizing your content types at the individual, child-calendar level. For example: You have a blog calendar, which you've selected, and now you're narrowing down your content types list so that only blog-related content types are included.
In some cases, you may wish to have the same content type customization (ex: custom content types) applied or available for all of your calendars. In that case, you should go to the calendars selection drop-down menu in the top drop-down and select "All Calendar". When selected, your content type customization will be applied/propagated down to all child calendars.
For example: Let's say that my team regularly produces banner ads for several of our websites. Each website has its own Divvy child calendar. Instead of adding a "banner ad" custom content type to each website calendar, you add that custom content type at the All Calendars level, which will make the banner ad type available for each child calendar. Then you can select or deselect that banner ad content type when configuring each child calendars' final content type list.
Managing Default Content Types
Based on your calendar selection, browse through the list of default content types and check all that should be included for your selected calendar. As you check or uncheck each checkbox, you'll see your final content types list being updated in the right column.
Adding a Custom Content Type
To add a custom content type, simply input its name in the Add/Edit Content Type overlay and hit the blue Add New Content type button. By default, your new custom content type will be checked.
Editing a Custom Content Type
Should you need to edit an existing, custom content type, click the blue Edit link next to the custom content type. This will bring up the Edit Content Type overlay (screen below). In this overlay, you can edit the content type's name, select a provided icon to represent it, or upload your own icon.

Uploading Your Own Custom Content Type IconDo you have a custom content type and none of our canned icons do it justice? Did you put your fancy pants on today and you just want to trick out your Divvy account? Thankfully you can create and upload your own icons and associate them with any custom content type.
Just click the Edit link next to your custom content type to bring up the Edit Content Type overlay. Look for the "Would you like to upload and use a new icon?" and click YES. This will trigger a file browser for locating and uploading your custom icon (screenshot below). Acceptable file formats include gif, png, jpg or jpeg. Ideal dimensions should be 100x100 pixels.

Content Strategy Tab
Content strategy is a key, upfront component of any successful content marketing initiative. Typical content strategy exercises include identifying your key audiences (personas), being thoughtful about the content topics they care about and having a plan for how to produce and deliver that content to them on a consistent basis.
With these best practices in mind, DivvyHQ provides several common, content strategy fields that can be preloaded with metadata that you've identified through your content strategy process. This allows you to mold your content strategy into the application, tag your content appropriately, and use this valuable metadata for various filtering and reporting purposes.
Available Fields
Content strategy metadata can be preloaded on a per calendar basis or at the Parent and All Calendars level. You can preload the following content strategy fields:
- Topic/Categories – Allows you to track certain topics and categories essential to your content strategy.
- Target Audiences – With whom does your content need to reach and resonate? Keep yourself and your team focused in on those individuals during content production.
- Buyer Stages – Have you mapped your buyer's journey? Which content types or topics would be most effective at each stage? Organizations who are thoughtful about this often "win".
- Publishing Channels – To which channels do you publish content? Preload your publishing channels so your team knows where each piece will ultimately live.
- Promotional Channels – Will you be promoting your content after it's published? Keep your team on the same page.
- GeoLocation - If you are geo-tagging or geofencing your target audience, you may want to use the geolocation field to tag your content properly.
- Keywords/Tags – We all know the power of Google. A keyword-centric content production and optimization effort should be part of any content marketing program. Keep your keywords top of mind whenever you are creating content by making use of this field.
How to Load Content Strategy Fields
Before you start populating these fields with data, think about which calendars your data is applicable to. You have the option to add metadata to single calendars, Parent calendars (Enterprise only) or at the All Calendars level. There is some data propagation set up behind the scenes, so for example, adding a content topic at the All Calendars level will propagate that topic down (make it available) to all parent and child calendars. This may be a big time saver if you have consistent topics or audiences that are applicable to all your calendars.
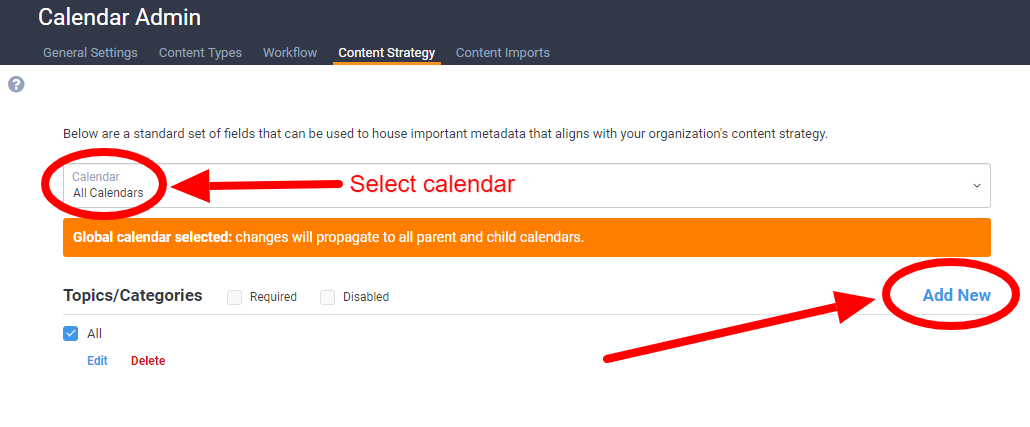
Select how you want to add your content strategy via the calendar drop down option (screen below). After clicking the blue Add New link, simply fill in the corresponding content strategy field within the Add New Content Strategy overlay.

Editing a Content Strategy Value
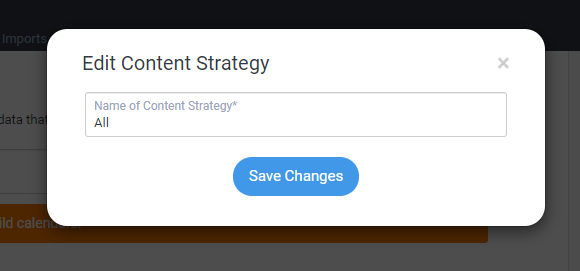
There's a blue edit link next to each content strategy value. Click the edit option and edit your field value and click Save Changes. Done.

Deleting A Content Strategy Value
There is a red delete button next to each content strategy value (screen below). Push it. Confirm the deletion via the Delete Content Strategy overlay. Done.

Requiring or Disabling Content Strategy Fields
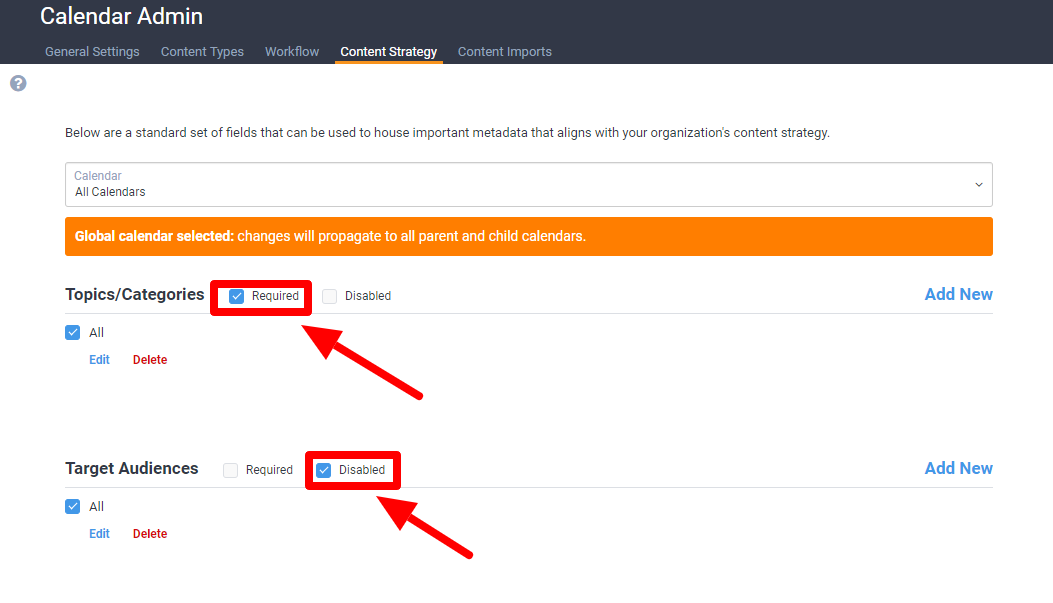
Next to each Content Strategy entry section, you'll see Required and Disabled checkboxes. In the event that one or more of these content strategy fields are either super important or not relevant at all, you can check the appropriate box. If you require a specific field, users will not be able to save a content item without checking a value in that field. If you disable a field, that field will not be visible within Divvy's Sandbox and CI Slide-in > Content Strategy section.

Content Strategy Fields
Content strategy is a key, upfront component of any successful content marketing initiative. Typical content strategy exercises include identifying your key audiences (personas), being thoughtful about the content topics they care about and having a plan for how to produce and deliver that content to them on a consistent basis.
With these best practices in mind, DivvyHQ provides several common, content strategy fields that can be preloaded with metadata that you've identified through your content strategy process. This allows you to mold your content strategy into the application, tag your content appropriately, and use this valuable metadata for various filtering and reporting purposes.
Available Fields
Content strategy metadata can be preloaded on a per calendar basis or at the Parent and All Calendars level. You can preload the following content strategy fields:
- Topic/Categories – Allows you to track certain topics and categories essential to your content strategy.
- Target Audiences – With whom does your content need to reach and resonate? Keep yourself and your team focused in on those individuals during content production.
- Buyer Stages – Have you mapped your buyer's journey? Which content types or topics would be most effective at each stage? Organizations who are thoughtful about this often "win".
- Publishing Channels – To which channels do you publish content? Preload your publishing channels so your team knows where each piece will ultimately live.
- Promotional Channels – Will you be promoting your content after it's published? Keep your team on the same page.
- GeoLocation - If you are geo-tagging or geofencing your target audience, you may want to use the geolocation field to tag your content properly.
- Keywords/Tags – We all know the power of Google. A keyword-centric content production and optimization effort should be part of any content marketing program. Keep your keywords top of mind whenever you are creating content by making use of this field.
How to Load Content Strategy Fields
Before you start populating these fields with data, think about which calendars your data is applicable to. You have the option to add metadata to single calendars, Parent calendars (Enterprise only) or at the All Calendars level. There is some data propagation set up behind the scenes, so for example, adding a content topic at the All Calendars level will propagate that topic down (make it available) to all parent and child calendars. This may be a big time saver if you have consistent topics or audiences that are applicable to all your calendars.
Select how you want to add your content strategy via the calendar drop down option (screen below). After clicking the blue Add New link, simply fill in the corresponding content strategy field within the Add New Content Strategy overlay.

Editing a Content Strategy Value
There's a blue edit link next to each content strategy value. Click the edit option and edit your field value and click Save Changes. Done.

Deleting A Content Strategy Value
There is a red delete button next to each content strategy value (screen below). Push it. Confirm the deletion via the Delete Content Strategy overlay. Done.

Requiring or Disabling Content Strategy Fields
Next to each Content Strategy entry section, you'll see Required and Disabled checkboxes. In the event that one or more of these content strategy fields are either super important or not relevant at all, you can check the appropriate box. If you require a specific field, users will not be able to save a content item without checking a value in that field. If you disable a field, that field will not be visible within Divvy's Sandbox and CI Slide-in > Content Strategy section.


